It’s my turn to be queen bee again, and the block I’ve chosen for my bee-mates to make is a Birds in the Air block that finishes at 12″. Like many quilters, I’ve recently been inspired by the colours used by Sochi in 2014 Winter Olympics. So this month, I would like my bee-mates to make blocks using those colours. You can focus on one of the colours used, or use all of them; it is up to you. I would like the background to be either low volume or solids, whatever you prefer, but please, please, make it very scrappy, and do not use just one fabric for the background.
I’ve put some of the information in text right on the pictures. If you have any questions or need any clarifications, just comment and I will get back to you as soon as I’m able.
Mark the back of the light 3″ squares, and layer them with the colour 3″ squares, right sides together (RST). Stitch 1/4″ away from the marked line, on both sides. Trim to 2.5″ I’ve found a great tutorial for trimming HSTs that only requires 2 cuts instead of 4. It has saved me so much time lately, and I used it here too. You can find it here.
Stitch one of each of the 2.5″ HSTs to one of the coloured rectangles (2.5″x3.5″). Iron the seam open.
Take 2 of these new sub-units, and rotate one of them 180 degrees. Stitch them together and iron the seam open. These units should measure 4.5″x5.5″.
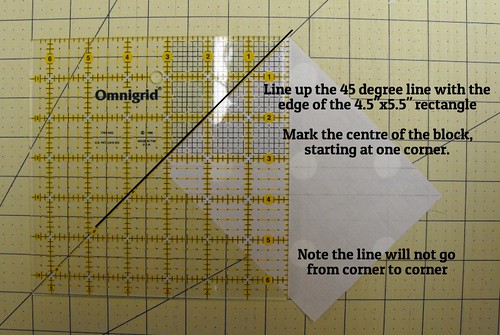
Take the background rectangles, 4.5″x5.5″, and mark them. Do this after you have sewn the other sub-unit so that you mark the correct diagonal. The faint line you see on some of these pieces of fabric is the line I marked first, which was incorrect, so I had to re-mark them.
Layer the marked rectangles with the other sub-unit. You can faintly see in this picture that you have to orient the background fabric so that the line does not bisect the HSTs that you made earlier. The correct marking line is the one going from the top left corner to the bottom right corner.
Stitch just off the line, toward the centre of the rectangle. If you stitch exactly on the line, you will cut off your triangle points. You want the stitching to be just beside the point of the little background triangle.
Cut apart your unit, 1/4″ away from your stitching line. You will have an extra little piece in the middle.
Your unit should measure 4.5″ square. Press the seam open and trim the dog ears.
Lay out your block like this and sew it together with a 1/4″ seam. Press all the seams open.
Your block should now measure 12.5″. And you’re done!
There are loads of ways to lay this block out. This is a 4×4 grid with some of the blocks rotated so that stars appear.
In this one, 4 blocks are sewn together to make a star, and the those larger blocks are set on point.
Here the blocks are set on point with alternating backgrounds. I could go on and on with this block, but this post is already very photo heavy, so I’ll just stop here. I hope you enjoyed this tutorial! If you need any clarification, just let me know.


great tut! i appreciate the different layout options too!
LikeLike
Pingback: Easy Street progress | Lisa in Port Hope
Pingback: Making triangles into squares (tutorial) | Lisa in Port Hope
Pingback: Cathy's Carousel ~ March Block | Mad About Patchwork
Pingback: Birds in the Air | Apple Pie Patchwork
This is a great tutorial! Thank you!
LikeLike